React 3D 웹앱 Basic 시리즈입니다.
- React 3D 웹앱 - 1. 개요
- React 3D 웹앱 - 2. Three.js
- React 3D 웹앱 - 3. 3D 모델
- React 3D 웹앱 - 4. 3D 뷰어
지난 편에서는 3D 앱에 넣을 애셋(재료)들을 구해봤습니다. 애셋들을 이용해서 React 3D 웹앱을 만들어 봅시다.
오늘의 목표

위와 같은 구성으로 앱을 만들어 볼 텐데요, 우선 create-react-library 패키지를 사용해서 React 라이브러리를 만듭니다.
- create-react-library react3d
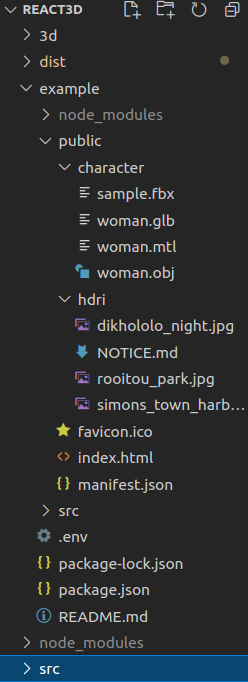
애셋들은 create-react-library로 자동 생성된 example 앱의 public 폴더 안에 넣습니다. 3D 캐릭터는 public/character/, HDRI 이미지는 public/hdri/ 에 넣었습니다. 이제 이 애셋들은 실행주소를 기반으로 접근 가능합니다.
- e.g. http://localhost:3000/character 혹은 http://localhost:3000/hdri
이 example 앱의 소스 코드는 다음과 같습니다.
import React, { Fragment } from 'react'
import React3DComponent from '@rubenchoi/react3d'
import * as Icon from 'react-feather';

const App = () => {
  const [show, setShow] = React.useState(true);

  return (<>
    <div style={{ width: '100vw', height: '100vh', overflow: "hidden", border: "1px dotted gray" }}>
      <React3DComponent showDetail={show} />
    </div>

    <div style={{ position: 'absolute', right: 3, top: 0 }}>
      <div style={{ fontSize: '0.5em' }}
        onClick={() => setShow(!show)}>
        {show ?
          <Icon.EyeOff color='gray' size={24} />
          : <Icon.Settings color='orange' size={24} />
        }
      </div>
    </div>
  </>);
}

export default App
라이브러리 컴포넌트 자체에서 캐릭터나 이미지 등을 설정하기 때문에 별도의 옵션 값을 넣어줄 필요가 없습니다. 즉, create-react-app으로 임의의 React 앱을 만들고 라이브러리만 설치(npm install --save @rubenchoi/react3d) 후 <React3DComponent />만 넣으면 됩니다. 다만 우리 예제 앱에서는 설정 메뉴를 보이거나 감추기 위한 showDetail 파라미터만 사용했습니다.
뷰어 라이브러리
라이브러리 코드를 살펴보겠습니다. 메인 코드는 다음과 같습니다.
import React, { Fragment } from 'react';
import * as THREE from 'three';
import { OrbitControls } from 'three/examples/jsm/controls/OrbitControls.js';
import Character from '../character/Character.js';
import Decoration from './Decoration.js';

class Viewer extends React.Component {
    constructor(props) {
        super(props);
        this.state = {
            scene: undefined,
            delta: 0,
        }
        this.clock = new THREE.Clock();
    }

    componentDidMount() {
        const canvas = this.props.canvas;

        const width = canvas ? canvas.clientWidth : window.innerWidth - 1;
        const height = canvas ? canvas.clientHeight : window.innerHeight - 1;

        this.scene = new THREE.Scene();
        this.camera = new THREE.PerspectiveCamera(50, width / height, 1, 1000);
        this.camera.position.set(0, 2, 30);
        this.scene.position.set(0, -3, 0);

        this.renderer = new THREE.WebGLRenderer({ antialias: true, preserveDrawingBuffer: true, alpha: true, canvas: canvas });
        this.renderer.shadowMap.enabled = true;
        this.renderer.toneMapping = THREE.ACESFilmicToneMapping;
        this.renderer.outputEncoding = THREE.sRGBEncoding;

        this.renderer.setSize(width, height);
        this.renderer.setPixelRatio(window.devicePixelRatio);
        this.renderer.setClearColor(0x000000, 0);

        let orbit = new OrbitControls(this.camera, this.renderer.domElement);
        orbit.enableZoom = true;
        orbit.enabled = true;

        if (!canvas) {
            this.drawingElement.appendChild(this.renderer.domElement);
        }

        this.setState({ scene: this.scene });
        this.animate();

        this.props.onInit && this.props.onInit(this.renderer.domElement);
    }

    shouldComponentUpdate(nextProps, nextState) {
        return this.state.delta === nextState.delta;
    }

    animate = () => {
        this.setState({ delta: this.clock.getDelta() });

        if (this.resizeRendererToDisplaySize(this.renderer)) {
            const canvas = this.renderer.domElement;
            this.camera.aspect = canvas.clientWidth / canvas.clientHeight;
            this.camera.updateProjectionMatrix();
        }

        this.renderer.render(this.scene, this.camera);
        requestAnimationFrame(this.animate);
    }

    resizeRendererToDisplaySize(renderer) {
        const canvas = renderer.domElement;
        const width = canvas.clientWidth;
        const height = canvas.clientHeight;
        const needResize = canvas.width !== width || canvas.height !== height;
        if (needResize) {
            renderer.setSize(width, height, false);
        }
        return needResize;
    }

    //Recommended style of parent element: {{ width: '100vw', height: '100vh', overflow: "hidden" }}>
    render() {
        return (
            <div style={{ position: 'relative' }}>
                {!this.props.canvas && <div ref={el => this.drawingElement = el} style={{ position: 'absolute', width: '100%', height: '100%', zIndex: 0 }} />}

                {!this.props.domForDatGui && <div ref={el => this.domForDatGui = el} style={{ position: 'absolute', right: '30%', zIndex: 6 }} />}

                {this.state.scene &&
                    <>
                        <Character
                            scene={this.state.scene}
                            delta={this.state.delta}
                            showDetail={this.props.showDetail}
                        />
                        <Decoration
                            scene={this.state.scene}
                            renderer={this.renderer}
                            showDetail={this.props.showDetail}
                        />
                    </>
                }
            </div>
        )
    }
}

export default Viewer;
얼핏 보면 이전 편에서 다뤘던 3D 박스 그리기와 크게 다르지 않습니다. 새로 추가된 부분이라면 (1)화면에서 카메라를 컨트롤하기 위한 OrbitControls이 추가되고 (2)THREE.Clock() - state.delta 값을 통해 프레임 애니메이션을 수행한다는 정도입니다.
그리고 마지막에 render() 안에 Character 컴포넌트와 Decoration 컴포넌트가 추가된 점인데요, 전자는 캐릭터, 후자는 3D 화면을 관리하기 위한 컴포넌트입니다. 이처럼 컴포넌트를 나눠두면 유지보수나 가독성 측면에서도 이득이지만, 운영 측면에서도 일부 컴포넌트에 문제가 발생해도 나머지 컴포넌트들은 독립적으로 잘 돌아가는, 즉 안정성을 확보할 수 있습니다.
Decoration
import React, { Fragment } from 'react';
import { Button, Dropdown, DropdownItem, DropdownMenu, DropdownToggle } from 'reactstrap';
import * as THREE from 'three';
import Draggable from 'react-draggable';

const hdriInfo = [
    { title: 'Night', filepath: 'hdri/dikhololo_night.jpg' },
    { title: 'Park', filepath: 'hdri/rooitou_park.jpg' },
    { title: 'Harbour', filepath: 'hdri/simons_town_harbour.jpg' }
]

class Decoration extends React.Component {
    constructor(props) {
        super(props);
        this.scene = props.scene;
        this.renderer = props.renderer;

        this.state = {
            selectHdri: false,
            showExample: true,
        }
    }

    componentDidMount() {
        this.setLight();
        this.props.title && this.setTitle(this.props.title);
        this.setGround();
        this.setExample();
        this.setBackgroundHdri();
    }

    shouldComponentUpdate(nextProps, nextState) {
        if (this.state.selectHdri !== nextState.selectHdri
            || this.state.showExample !== nextState.showExample) {
            return true;
        }
        return false;
    }

    setBackgroundMono = () => {
        this.scene.background = new THREE.Color(0x050055);
        this.scene.fog = new THREE.Fog(this.scene.background, 500, 10000);
    }

    setBackgroundHdri = (filepath = hdriInfo[0].filepath) => {
        const loader = new THREE.TextureLoader();
        const texture = loader.load(
            filepath,
            () => {
                const rt = new THREE.WebGLCubeRenderTarget(texture.image.height);
                rt.fromEquirectangularTexture(this.renderer, texture);
                this.scene.background = rt.texture;
            }
        );
    }

    setTitle = (title = '') => {
        let loader = new THREE.FontLoader();
        loader.load('https://raw.githubusercontent.com/mrdoob/three.js/master/examples/fonts/helvetiker_bold.typeface.json', (font) => {
            var textGeometry = new THREE.TextGeometry(title, {
                font: font,
                size: 1,
                height: 0.5,
                curveSegments: 10,
                bevelThickness: 0.1,
                bevelSize: 0.1,
                bevelEnabled: true
            });

            let textMaterial = new THREE.MeshPhongMaterial({ color: 0x909399, specular: 0xffffff });
            this.scene.remove(this.textMesh);
            this.textMesh = new THREE.Mesh(textGeometry, textMaterial);
            this.textMesh.position.set(title.length / 2 - 1, -5, 6);
            this.scene.add(this.textMesh);
        });
    }

    setLight = () => {
        let ambLight = new THREE.AmbientLight(0xffffff, 0.8);
        this.scene.add(ambLight);
    }

    setGround = () => {
        let floor = new THREE.Mesh(new THREE.PlaneGeometry(20, 20, 1, 1), new THREE.MeshPhongMaterial({ color: 0xffffff, opacity: 0.1, transparent: true }));
        floor.rotation.x = -0.5 * Math.PI;
        floor.receiveShadow = true;
        this.scene.add(floor);
    }

    getSelectHdri = () => {
        let rows = [];
        hdriInfo.forEach((item, i) => {
            rows.push(<DropdownItem onClick={() => this.setBackgroundHdri(item.filepath)} key={i}>{item.title}</DropdownItem>);
        })
        return rows;
    }

    setVideo = (video) => {
        const texturebg = new THREE.VideoTexture(video);
        texturebg.minFilter = THREE.LinearFilter;
        texturebg.maxFilter = THREE.LinearFilter;
        texturebg.format = THREE.RGBFormat;
        this.scene.background = texturebg;
    }

    setExample = (show = true) => {
        let sphere = new THREE.Mesh(new THREE.SphereGeometry(2, 8, 8), new THREE.MeshBasicMaterial({ color: 0x02ce2e }));
        sphere.position.set(0, -3, -10);
        let exampleGroup = new THREE.Group();
        exampleGroup.add(sphere);
        exampleGroup.name = "example";
        exampleGroup.add(new THREE.Mesh(new THREE.BoxGeometry(1, 1, 1), new THREE.MeshBasicMaterial({ color: 0xfff000 })));

        if (show) {
            this.scene.add(exampleGroup);
        } else {
            this.scene.traverse((child) => {
                if (child.name === 'example') {
                    this.scene.remove(child);
                }
            })
        }
    }

    toggleExample = () => {
        let newVal = !this.state.showExample;
        this.setState({ showExample: newVal });
        try {
            this.setExample(newVal);
        } catch (err) { }
    }

    render() {
        return (<>
            {this.props.showDetail &&
                <Draggable>
                    <div style={{ position: 'relative', width: '200px', padding: '1em', zIndex: 1, backgroundColor: 'rgba(255, 255, 255, 0.5)' }}>
                        <Dropdown isOpen={this.state.selectHdri} toggle={() => this.setState({ selectHdri: !this.state.selectHdri })}>
                            <DropdownToggle color="primary" style={{ fontSize: '0.8em' }} caret>
                                Select HDRI
                            </DropdownToggle>
                            <DropdownMenu style={{ fontSize: '0.8em' }}>
                                {this.getSelectHdri()}
                            </DropdownMenu>
                        </Dropdown>
                        <hr />
                        <Button color={this.state.showExample ? 'secondary' : 'success'} style={{ fontSize: '0.8em' }}
                            onClick={this.toggleExample}>{this.state.showExample ? 'Hide examples' : 'Show examples'}</Button>
                    </div>
                </Draggable>
            }
        </>);
    }
}

export default Decoration;
과거 C언어 시대에는 주석을 덕지덕지 달아서 적도 속이고 나도 속이는 경우가 많았는데요, 요즘에는 주석 없이도 그림책처럼 읽어내려갈 수 있는 가독성 좋은 코딩 스타일이 대세인 것 같아요. Decoration은 상당히 직관적이라 크게 설명이 필요 없을 것 같은데요, 배경, 바닥, 라이팅, 텍스트 등을 설정하는 함수들은 대부분 three.js 예제에서 가져 온 자바스크립트 코드라 특이점이 없습니다. 다만 HDRI 이미지를 배경으로 까는 코드는 예전에는 fromEquirectangularTexture() 결과인 rt 자체를 할당했던 것 같은데 현재 three.js에서는 rt.texture를 할당해야 정상적으로 돌아가네요.
3개의 HDRI 이미지를 사용하는데 이를 GUI로 고를 수 있도록 render()에서 드롭다운 버튼을 제공해줍니다. getSelectHdri()는 React의 JSX 문법을 함수로 생성하는 부분이라 기억해두면 좋을 것 같습니다.
Character
3D 캐릭터 코드는 범위가 상당해서 새로 시작할 React 3D 웹앱 튜토리얼 시리즈 캐릭터 편에서 깊이 다룰 것이라서, 이번 편에서는 간단히 3D 캐릭터 로딩하는 정도로 마무리하겠습니다.
import { GLTFLoader } from 'three/examples/jsm/loaders/GLTFLoader';
import { FBXLoader } from 'three/examples/jsm/loaders/FBXLoader';
import { TGALoader } from 'three/examples/jsm/loaders/TGALoader';
import { DDSLoader } from 'three/examples/jsm/loaders/DDSLoader';
import { MTLLoader } from 'three/examples/jsm/loaders/MTLLoader';
import { OBJLoader } from 'three/examples/jsm/loaders/OBJLoader';
코드 상단을 보면, 이렇게 다양한 Loader를 import하는데요, 3D 모델 형식이 FBX, Collada, GLTF, MTL 등 다양하기 때문입니다.
loadCharacter = () => {
        let fullpath = this.state.spec.filepath;
        console.log("Character loading...", fullpath);

        let manager = new THREE.LoadingManager();
        manager.addHandler(/\.tga$/i, new TGALoader());
        manager.addHandler(/\.dds$/i, new DDSLoader());

        let loader = undefined;
        if (fullpath.includes('fbx') || fullpath.includes('FBX')) {
            loader = new FBXLoader(manager);
        } else if (fullpath.includes('glb') || fullpath.includes('GLB')) {
            loader = new GLTFLoader();
        }

        if (loader !== undefined) {
            return new Promise((resolve, reject) =>
                loader.load(fullpath, (obj) => {
                    let character = obj.scene ? obj.scene : obj;
                    this.controller = [];
                    character.traverse(this.parseRig);
                    this.postprocess(character);
                    console.log("-------------3D character loaded: ", character);
                    this.setState({ datGuiItems: this.controller });
                    character.name = 'character';
                    resolve(character);
                })
            );
        } else {
            //Test purpose - when given file is .MTL/.OBJ
            return new Promise((resolve, reject) => {
                new MTLLoader(manager)
                    .setPath(Spec.basedir)
                    .load('woman.mtl', (materials) => {
                        materials.preload();
                        new OBJLoader(manager)
                            .setMaterials(materials)
                            .setPath(Spec.basedir)
                            .load('woman.obj', (obj) => {
                                let character = obj.scene ? obj.scene : obj;
                                this.controller = [];
                                character.traverse(this.parseRig);
                                this.postprocess(character);
                                console.log("-------------3D character loaded: ", character);
                                this.setState({ datGuiItems: this.controller });
                                character.name = 'character';
                                resolve(character);

                            }, undefined, (err) => reject(err));

                    })
            });
        }
    }
그래서 우리 코드에서는 확장자 명에 따라 로더를 구분합니다. FBX나 GLTF 같은 경우에는 로더의 load() 함수를 부르는 구조인데, MTL 같은 경우에는 먼저 .mtl 파일을 로딩하고 뒤이어 .obj에 있는 매터리얼을 입히는 방식이기 때문에 else 구문으로 분기했습니다.
어쨌거나 loadCharacter() 함수는 Promise를 리턴하는 async 함수이고 로딩 결과는 resolve(캐릭터)로 전달되기 때문에 이 loadCharacter() 호출자는 어떤 로더가 사용되는지 신경쓸 필요가 없죠.
캐릭터가 로딩되면 parseRig()에서 리깅(뼈) 정보를 분석하고 컨트롤 메뉴에 추가하게 되고
postprocess()에서 후처리 - 가령 캐릭터 크기를 조정하거나 필요한 로테이션을 수행합니다.
character.name을 설정하는 이유는 캐릭터를 변경할 때 기존의 character를 제거하기 위해서 아래 코드가 사용되기 때문입니다.
    resetCharacter = (spec) => {
        try {
            this.props.scene.traverse(child => {
                if (child.name && child.name === 'character') {
                    this.props.scene.remove(child);
                }
            })
        } catch (err) { }
        this.setState({ spec: spec }, () => this.load());
    }
3D 캐릭터는 모델마다 형식도 다르고 크기나 3차원 좌표 정보, 포함된 애니메이션도 상이한 경우가 많습니다. 앞으로 어떤 모델이 추가될 지 모르는 상황을 고려하여, 변동부를 추상화하여 확장성을 확보합니다. 즉,
const BASE_DIR = window.location.protocol + '//' + window.location.hostname + ':' + window.location.port + '/character/';

export const MetaWoman = {
    name: 'Meta Woman Glb',
    filepath: BASE_DIR + 'woman.glb',
    scale: 50.0,
    animations: [
        { filepath: BASE_DIR + 'Arm Stretching.fbx', name: 'Arm Stretching' },
        { filepath: BASE_DIR + 'Happy Idle.fbx', name: 'Happy Idle' },
    ]
}
가령 모델마다 scale이 다른 점은 위와 같이 모델별 spec 파일에 scale 정보를 넣고 이를 모델이 로딩되는 postprocess() 함수에서 처리하도록 한다면, 모델마다 서로 다른 값으로 스케일이 변경되어 뷰어에서는 일관된 크기로 보이게 될 것입니다.
여기까지만 이해해도 예쁜 배경과 3D 캐릭터를 가진 React 3D 웹앱을 만들 수 있습니다.
자세한 내용은 예제 코드를 참고하기 바라며,
좀 더 깊은 내용은 이어지는 React 3D 웹앱 - 캐릭터편 튜토리얼에서 이어가겠습니다.
'IT > 3D Web' 카테고리의 다른 글
| 메타버스 앱 - 1. 3D 파일 업로드 (2) | 2021.07.01 |
|---|---|
| Google TTS (0) | 2021.05.27 |
| React 3D 웹앱 - 3. 3D 모델 (0) | 2021.03.18 |
| React 3D 웹앱 - 2. Three.js (1) | 2021.03.11 |
| React 3D 웹앱 - 1. 개요 (0) | 2021.03.11 |