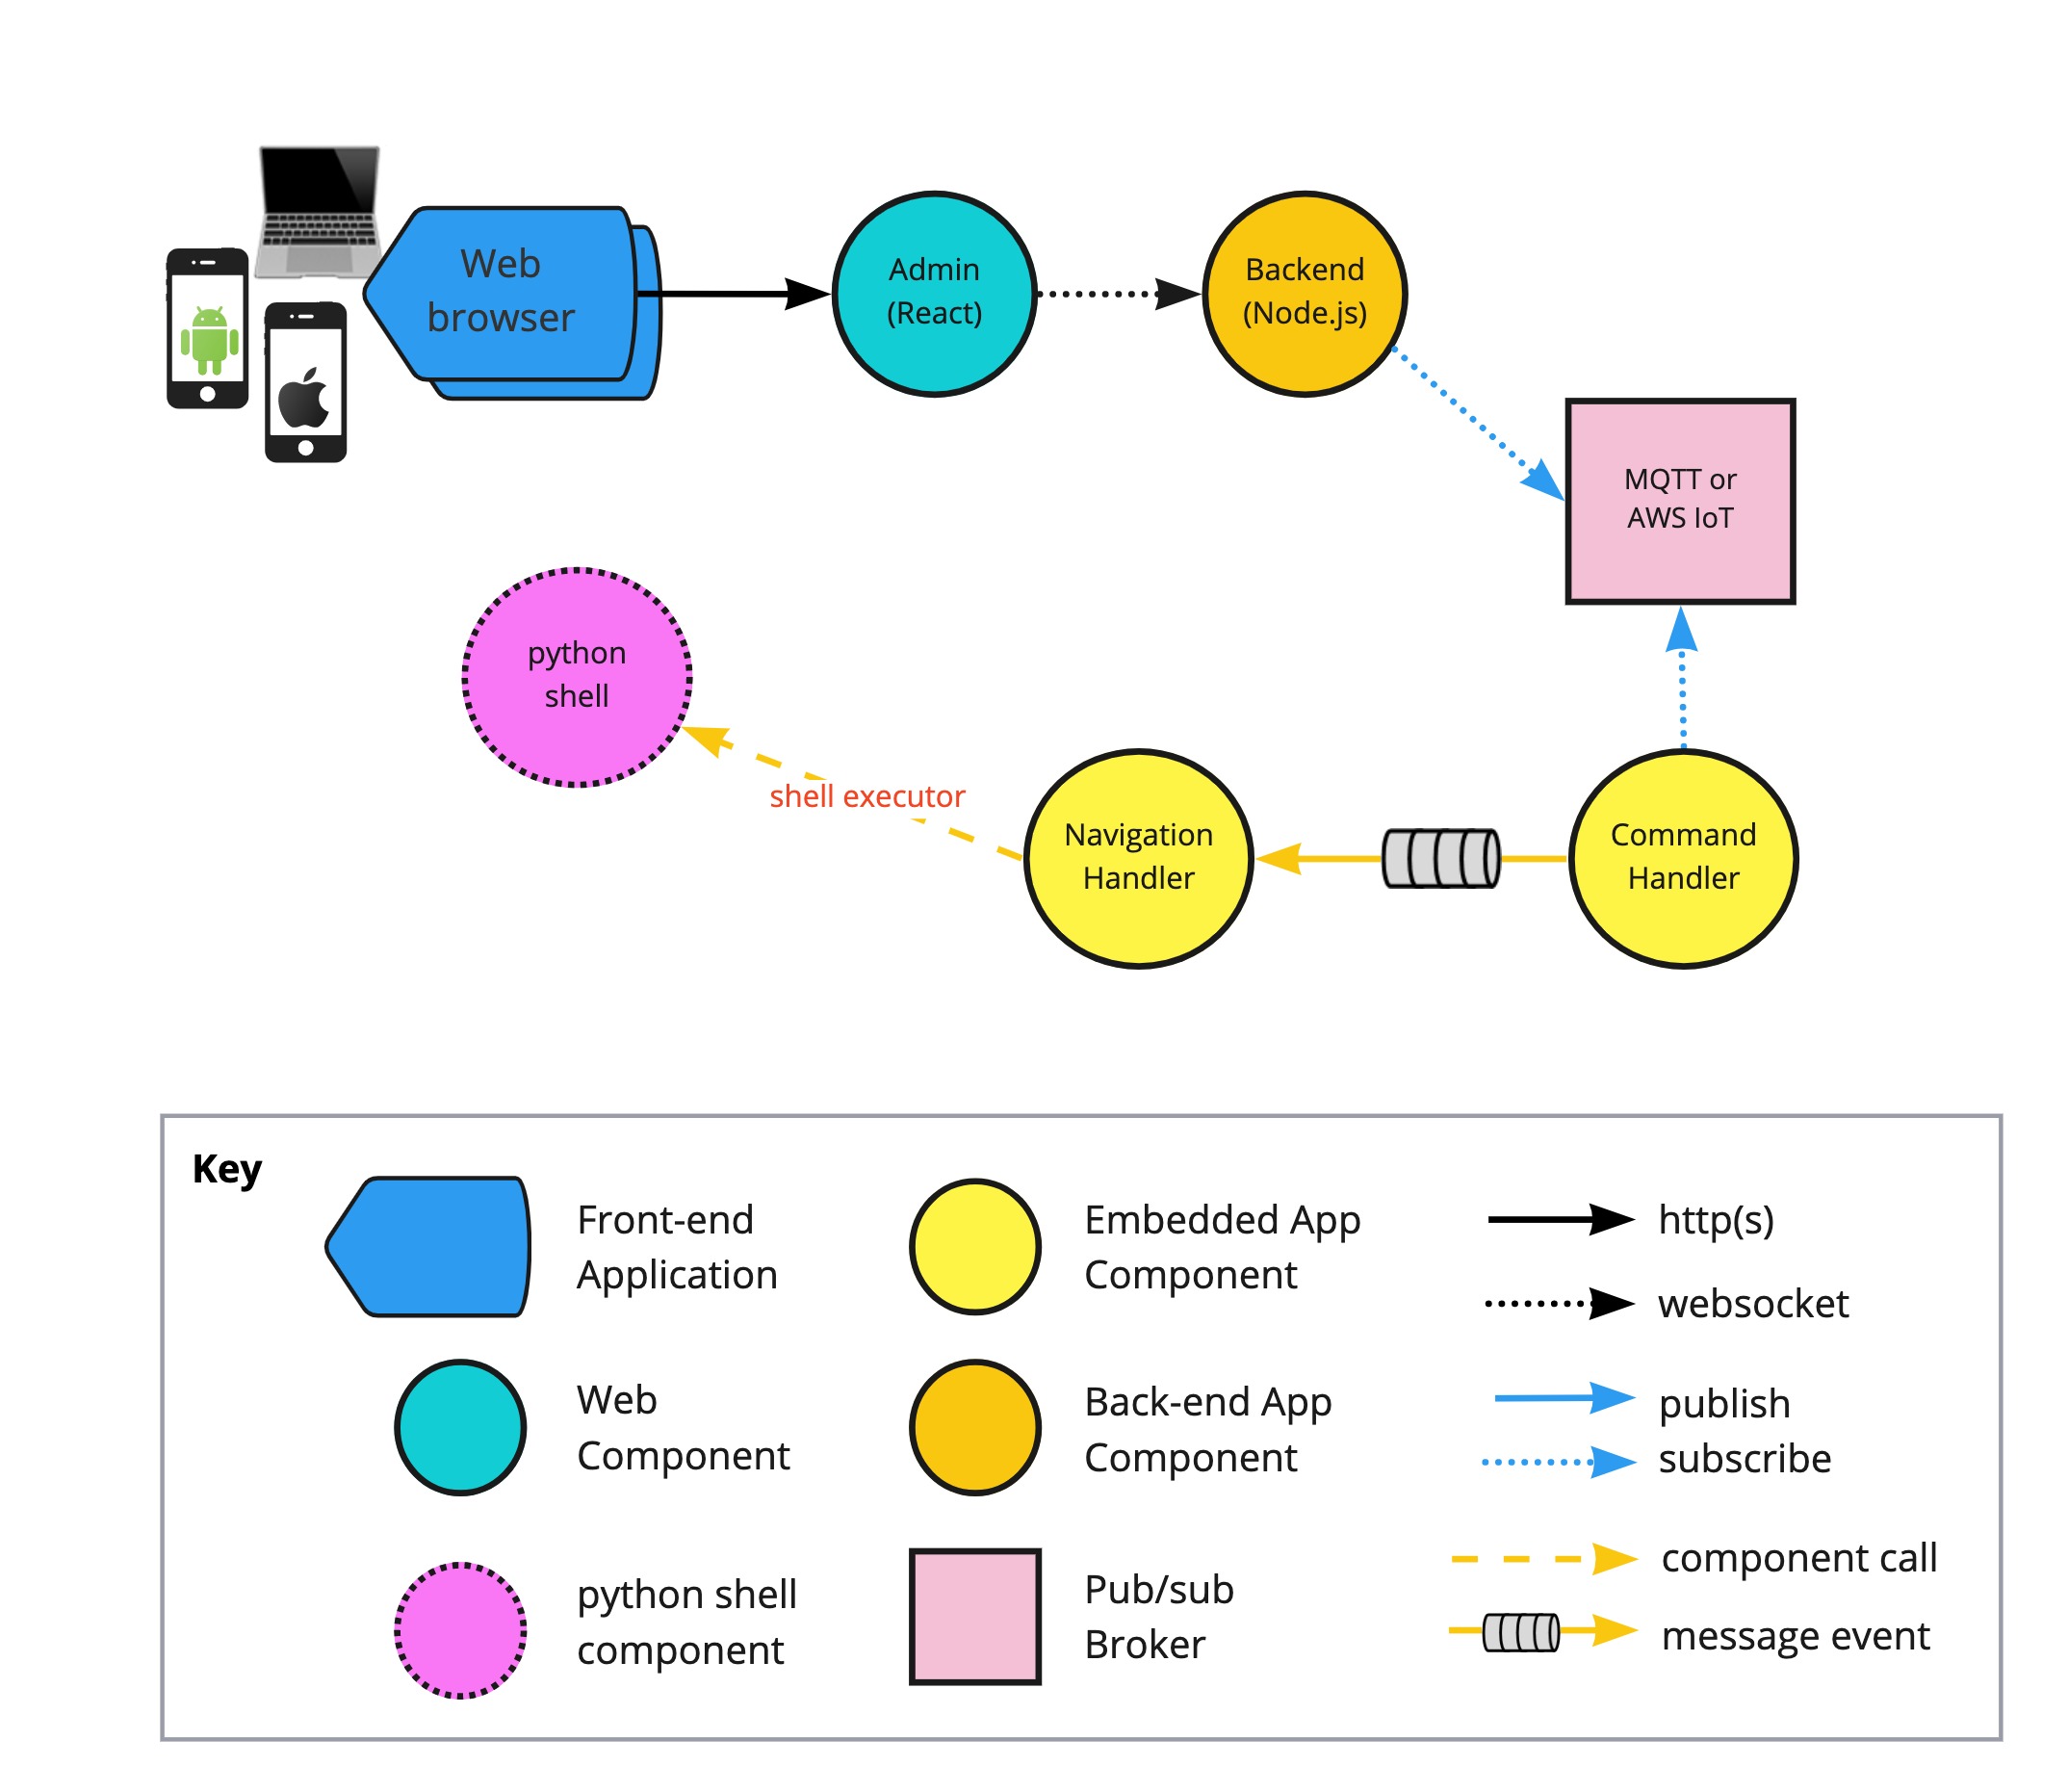
Node.js 백엔드 서버에서 쉘 스크립트(.sh)나 파이썬 파일(.py)을 실행하는 방법에 대해 알아봅시다. 컴포넌트 뷰는 아래와 같습니다.
우선 node.js 프로젝트를 생성하고 필요한 라이브러리를 설치합니다.
npm init
npm install child_process mqtt yargs
여기서 child_process는 쉘 명령을 실행해주는 라이브러리고
mqtt는 쉘 명령의 결과 즉 콘솔 로그를 서버로 전송하기 위한 MQTT Client입니다.
yargs는 커맨드 라인 입력을 처리하기 위한 라이브러리입니다.
이제 메인 코드를 만들어봅시다.
const mqtt = require('mqtt');

const logger = (...args) => console.log("[backend] ", ...args);

const SHELL_LAUNCHER = './nodejs/shell-launcher.js'

const DEFAULT_HOST = "ws://127.0.0.1:8888"
const DEFAULT_TOPIC = "backend-shell-launcher"

const topic = DEFAULT_TOPIC;

const mqttClient = mqtt.connect(DEFAULT_HOST);
mqttClient.on('connect', () => {
    logger('mqtt connected');

    mqttClient.subscribe(topic);
    mqttClient.on('message', (topic, message) => logger(`received<<${topic}>> ${message.toString()}`));
});

require('yargs')
    .command({
        command: 'python',
        handler: (argv) => {
            const filename = argv._[1];
            logger(`[Shell Launcher] node backend.js py ${filename}`);
            require(SHELL_LAUNCHER)(true, filename, mqttClient, topic);
        }
    })
    .command({
        command: ['shell', '*'],
        handler: (argv) => {
            const filename = argv._[1];
            logger(`[Shell Launcher] node backend.js shell ${filename}`);
            require(SHELL_LAUNCHER)(false, filename, mqttClient, topic);
        }
    })
    .showHelpOnFail(true)
    .help('help', 'node backend.js pylaunch filepath')
    .demandCommand()
    .argv
상단에서 mqtt 클라이언트를 설정하고 연결합니다. DEFAULT_URL에 mqtt broker URL를 입력하면 되겠죠.
토픽에 subscribe한 이유는 SHELL_LAUNCHER publish 데이터가 정상적인지 로컬에서 검증해 보기 위함입니다.
MQTT가 궁금하다면, https://rubenchoi.tistory.com/entry/MQTT 를 참고하세요.
SHELL_LAUNCHER를 좀 더 들여다 봅시다.
const TEST_FILE = 'test1'

const logger = (...args) => console.log("[shell-launcher] ", ...args);

class ShellLauncher {
    constructor(isPython = true, filename = TEST_FILE, mqttClient, topic) {
        try {
            const BASE_DIR = require('path').resolve(__dirname, isPython ? "../python" : "../shell");
            const filepath = `${BASE_DIR}/${filename}.${isPython ? 'py' : 'sh'}`;
            logger(`launch ${isPython ? 'python ' : ''} shell for ${filepath}`);
            const command = require('child_process').spawn(isPython ? 'python3' : 'sh', [filepath], { cwd: BASE_DIR });
            command.stdout.on("data", m => {
                const received = m.toString().trim();
                mqttClient.publish(topic, received);
                logger(received);
            });
            command.stderr.on("data", m => {
                logger('********** ERROR **********')
                logger(m.toString())
            });
            command.on("exit", m => logger(`test ends`));
        } catch (err) {
            logger(err);
        }
    }
}

module.exports = (isPython, filename, mqttClient, topic) => {
    return new ShellLauncher(isPython, filename, mqttClient, topic);
};
앞서 backend.js에서 yargs를 통해 커맨드 라인 인자로 python인지 shell인지 받을 수 있는데요,
이를 첫 번째 파라미터 isPython으로 판단하여 python3를 실행할지 sh을 실행할지 결정하게 됩니다.
child_process를 이용하여 파일(두 번째 인자로 받은 파일명)을 실행합니다.
문법은 간단합니다.
child_process.spawn(명령, 파라미터들, { cmd : 작업 디렉토리 })로 받은 command 객체를 가지고
command.stdout.on('data', onReceive())으로 처리하는데,
우리 예제에서는 onReceive() 부분을 mqtt publish하는 람다 함수로 넣어줬습니다.
이제 검증해봅시다.
우선 node.js child_process를 통해 실행할 쉘 스크립트 test1.sh을 만들어 ./shell 폴더에 넣어둡니다.
#!/bin/bash
x=1
while [ $x -le 5 ]
do
    echo "test counter $x"
    x=$(( $x + 1 ))
    sleep 1
done
실행합니다.
$ node backend.js shell test1
[backend]  [Shell Launcher] node backend.js shell test1
[shell-launcher]  launch  shell for /tutorial/backend/shell/test1.sh
[shell-launcher]  test counter 1
[backend]  mqtt connected
[shell-launcher]  test counter 2
[backend]  received<<backend-shell-launcher>> test counter 2
[shell-launcher]  test counter 3
[backend]  received<<backend-shell-launcher>> test counter 3
[shell-launcher]  test counter 4
[backend]  received<<backend-shell-launcher>> test counter 4
[shell-launcher]  test counter 5
[backend]  received<<backend-shell-launcher>> test counter 5
[shell-launcher]  test ends
shell-launcher에서 외부 쉘 명령을 수행하고 그 콘솔 로그를 받아 mqtt로 잘 보내는 것을 확인했습니다.